BvB 3-Bet Pot Deep Dive: 9♥ 5♦ 3♣ Rainbow at 100bb Cash
A complete solver-backed breakdown of one of the most common 3-bet pot textures in blind-vs-blind play. Learn the two-sizing c-bet strategy, when sets should slow-play, and the optimal probe frequencies across every street.

The blind-vs-blind 3-bet pot is one of the most complex and frequently misplayed spots in 100bb cash games. When the board comes 9♥ 5♦ 3♣ rainbow — one of the driest possible textures — both players face a deceptively nuanced decision tree that most regulars get wrong.
This deep dive breaks down every decision point from preflop through the river using solver-verified data. Whether you're the 3-bettor in position or the caller out of position, you'll walk away with a complete strategy for this board texture — and every board like it.
💡 WHAT YOU'LL LEARN
- Why BB uses two c-bet sizes (80% and 25% pot) — and which hands go in each
- Why sets never raise the big c-bet but raise the small one 64% of the time
- The optimal delayed c-bet strategy when BB checks back the flop
- A complete river framework using the 5-class hand classification system
Want to run this analysis on your own spots? Solver+ gives you access to precomputed GTO solutions for thousands of common spots, and Postflop+ lets you train these decisions against a GTO bot until they're automatic.
1 The Setup: Preflop Ranges
SB opens to 3bb. BB 3-bets to 9.6bb. SB calls. The pot is 19.2bb with 90.4bb behind for each player — an SPR of 4.71.
BB's 3-bet range is polar — premiums at the top, suited connectors and bluffs at the bottom. SB's calling range is condensed — hands too strong to fold but not strong enough to 4-bet (JJ+ and AK 4-bet).
SB (OOP Caller) — Condensed Range
SB's range is built for boards like this. With no JJ+ or AK (those 4-bet), the range is heavy on pocket pairs (22–TT), suited broadways (KQs–AQs), offsuit broadways (KQo–ATo), suited connectors (54s–T9s), and suited aces (A2s–A9s). It's a middle-heavy range that connects well with low-to-mid boards.
BB (IP 3-Bettor) — Polar Range
BB's range is wider (229 combos vs 196) and much more polar. It contains AA, KK, QQ, JJ at the top — hands SB cannot have — and a wide assortment of offsuit bluffs (A2o–A7o, K5o–K9o, T7o, J8o) at the bottom. Mid pairs like 77–TT are at 0.5 weight (mixing 3-bet vs call).
SB (OOP Caller)
215.4 combosCondensed · No JJ+ or AK · Heavy on pairs + suited connectors
BB (IP 3-Bettor)
245.5 combosPolar · Premiums at top + wide offsuit bluffs at bottom
Opacity reflects exact solver weight (0-100). Data from Solver+ API.
Range Comparison — Entering Flop
Opacity reflects solver weight. Side grids = unique excess, centre = overlap.
OOP Unique (SB excess)
Common (overlap)
IP Unique (BB excess)
215.4 combos
OOP range
54.5 shared
overlap
245.5 combos
IP range
Range Asymmetry → Strategy Asymmetry: BB's polar range creates the two-sizing dynamic on the flop. The overpairs need a big bet for protection. The bluffs and thin value need a small bet. SB's condensed range means check-call is the dominant response — SB has equity with most hands but none are strong enough to lead.
What's NOT in each range
SB does NOT have:
- JJ, QQ, KK, AA — these 4-bet
- AKs, AKo — 4-bet at high frequency
- Low offsuit trash — folds to 3-bet
BB does NOT have:
- Very low hands (32o, 42o) — even BB has a floor
- 77–TT at full weight — mixing 3-bet/call
- QJo, KJo at full weight — some stay flat
2 Board Analysis: 9♥ 5♦ 3♣ Rainbow
This is one of the driest possible flop textures. No flush draws. Almost no straight draws (only 46 has an open-ender). The board is low, disconnected, and rainbow — a Type B board where the default strategy is "small bet or check."
Range–Board Interaction
SB smashes this board:
Sets (33, 55, 99), top pairs (A9s, K9s, Q9s), suited connectors with equity (76s, 87s, 65s, 54s), all pocket pairs 22–TT
BB partially connects:
Overpairs (AA–JJ that SB can't have), some 9x combos (K9o, Q9o, T9s), but also tons of complete air (A2o–A7o, K5o–K7o)
The Twist: On a Type B board, the default is small-or-check. But the solver reveals BB uses two sizes: 80% pot and 25% pot. Why? Vulnerable overpairs (QQ, JJ, TT) need the big sizing to deny equity from SB's 6-out overcard hands. This is the Type B exception — equity protection overrides the dry-board default.
3 Pot Geometry: Planning Across Streets
At SPR 4.71, how many streets of value can each hand type extract? The answer depends on which flop sizing BB chooses — and this choice shapes the entire hand tree.
| Hand Strength | Streets for Stacks | Sizing Plan |
|---|---|---|
| Sets, two pair | 3 streets comfortably | Any sizing — want all money in |
| AA, KK | 3 streets at ~60%/street | 25% flop → preserves 3-street plan |
| TT, JJ, QQ | 2 streets — must deny NOW | 80% flop → compress to turn + jam |
| Top pair (9x) | 1–2 streets max | Bet/call flop, reassess turn |
| Draws (76s, A4s) | Depends on odds | Check-raise or call, re-evaluate |
Pot Progression by Line
| Line | Pot After Flop | SPR → Turn | Pot After Turn | SPR → River |
|---|---|---|---|---|
| BB bets 80%, SB calls | 49.92bb | 1.50 | ~116bb | ~0.36 → jam |
| BB bets 25%, SB calls | 28.80bb | 2.97 | ~57.60bb | ~1.24 |
| BB checks back | 19.20bb | 4.71 | ~28.80bb | ~2.97 |
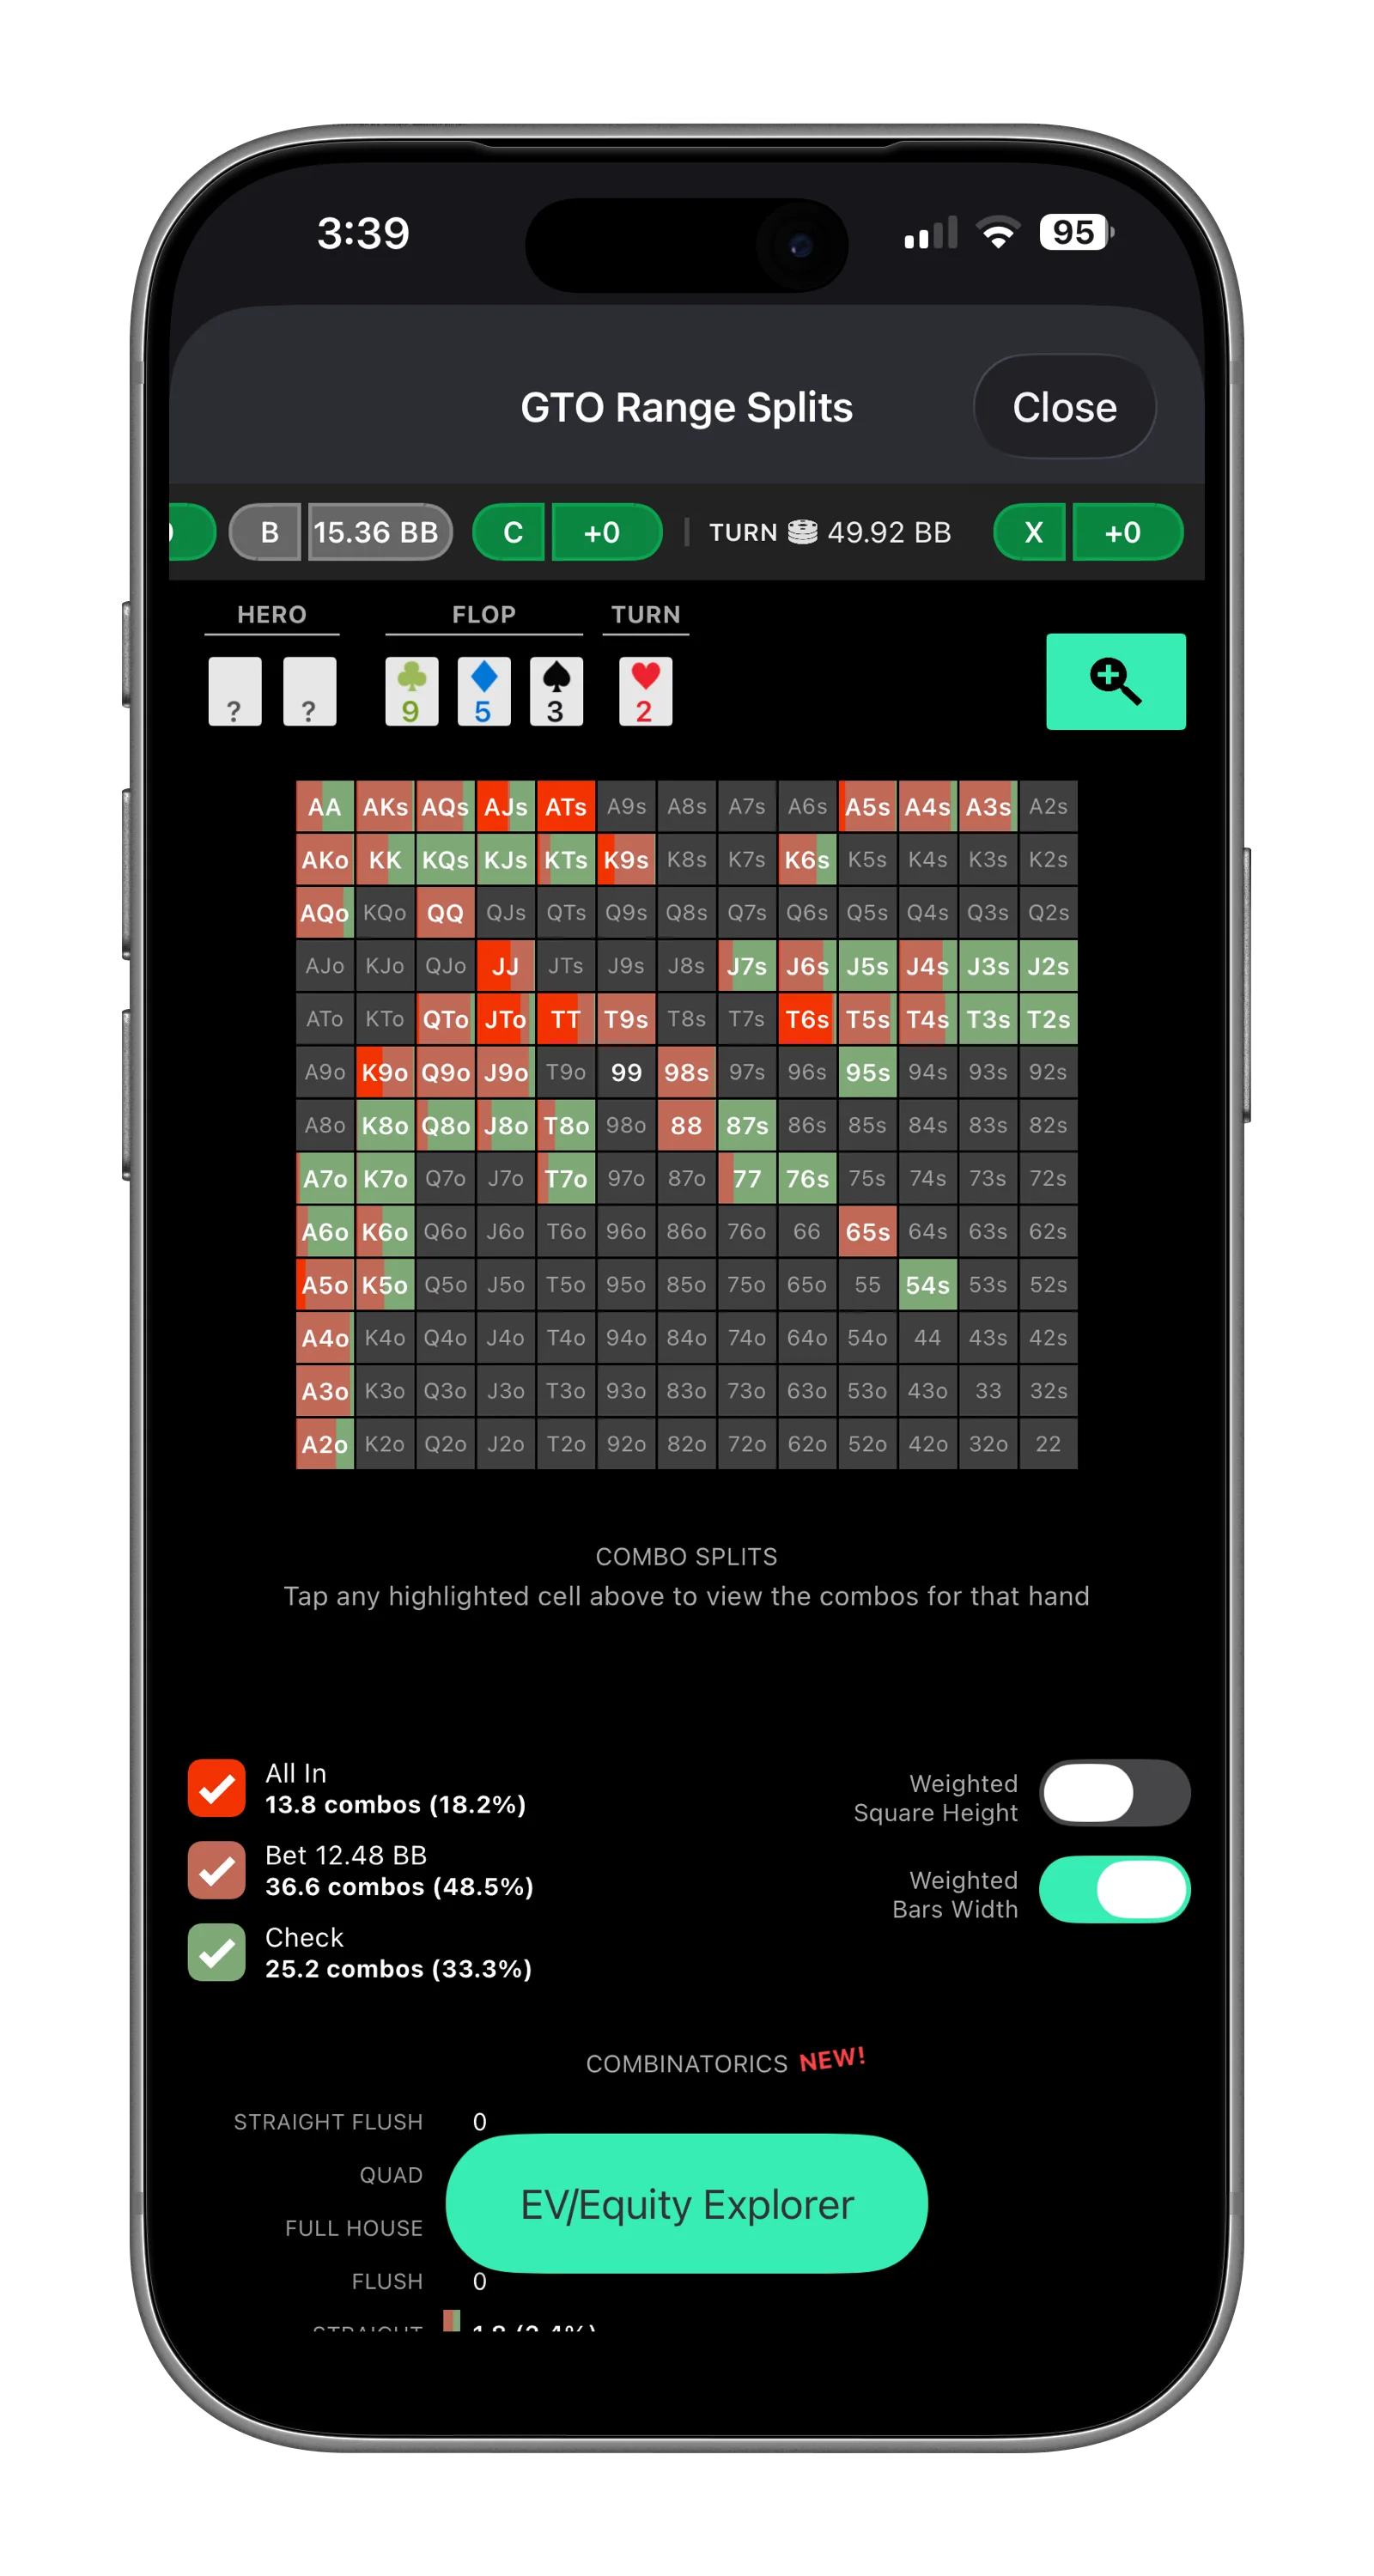
4 BB's Flop Strategy: The Two-Sizing Dynamic
After SB checks (which happens 98.3% of the time — treat it as always), BB faces the most important decision of the hand: bet size selection.
BB c-bets 58.6% of the time using two distinct sizes, and checks back 41.4%. This is not a range-bet spot. Each sizing serves a fundamentally different purpose.
Reserved for vulnerable overpairs and strong top pairs that need equity denial.
The big bet forces folds from SB's 6-out overcard hands and charges gutshots. After bet + call: pot = 49.92bb, SPR = 1.50 — a single turn barrel effectively commits both players.
| Hand | Bet 80% | Bet 25% | Check | Why |
|---|---|---|---|---|
| TT | 98.8% | 0.9% | 0.2% | Most vulnerable overpair. Bets huge to fold out SB's overcards. |
| JJ | 88.9% | 10.7% | 0.4% | Same logic, slightly less vulnerable. |
| 71.6% | 26.9% | 1.4% | Mixes — fewer overcards beat it, so small size captures value too. | |
| K9o | 69.9% | 20.4% | 9.7% | Top pair good kicker. Protection + value. |
| AKs | 44.2% | 38.4% | 17.5% | Two overcards. Denying SB's second/third pair is very profitable. |
| JTo | 47.4% | 20.6% | 32.0% | Two overcards, no draw. Pure semi-bluff. |
Thin value, equity denial with non-vulnerable hands, and balanced bluffs.
Extracts value from SB's weak pairs and underpairs while risking less. After bet + call: pot = 28.80bb, SPR = 2.97 — room for full turn + river extraction.
| Hand | Bet 80% | Bet 25% | Check | Why |
|---|---|---|---|---|
| AA | 27.8% | 43.6% | 28.6% | Not vulnerable to overcards. Small bet keeps SB's range wide. |
| KK | 38.7% | 47.2% | 14.2% | Same logic, slightly more vulnerable than AA. |
| 99 | 0.2% | 69.0% | 30.8% | Flopped set. No protection needed — keep villain in. |
| 95s | 4.5% | 82.2% | 13.2% | Two pair. Extract from SB's continuing range. |
| T9s | 6.5% | 53.0% | 40.5% | Top pair decent kicker. Thin value. |
| AQs | 16.1% | 43.8% | 40.1% | Overcards. Small bet denies equity at low cost. |
Hands with showdown value that don't benefit from betting, or pure air that can't profitably bluff.
SPR stays at 4.71. These hands either realize equity for free or start a delayed c-bet plan on the turn.
| Hand | Bet 80% | Bet 25% | Check | Why |
|---|---|---|---|---|
| ATs | 0.8% | 0.8% | 98.4% | Overcards with showdown value. Nearly pure check. |
| KQs | 2.3% | 4.7% | 93.0% | Strong overcards, no pair. Preserve equity realization. |
| AJs | 1.2% | 9.3% | 89.6% | Too much SDV to waste as a bluff. |
| 76s | 0.5% | 23.8% | 75.8% | Gutshot (needs a 4) + two overcards to the 3. No pair — pure draw. |
| K8o | 5.9% | 18.0% | 76.1% | K-high, no pair. Pure showdown value check. |
| T3s | 0.5% | 12.8% | 86.7% | Bottom pair (3s) with T overcard. Pot control. |
🔑 KEY INSIGHT: Overpair Vulnerability Drives the Big Size
TT bets big 98.8%. JJ bets big 88.9%. QQ bets big 71.6%. These hands have 2–4 overcards that can arrive on the turn and kill their equity. Meanwhile, the strongest hands (AA, KK, 99) prefer the small size or check — they are not vulnerable and want to keep SB's range wide. The big bet exists almost exclusively for vulnerable overpairs.

BB's flop range split on 9♥5♦3♣ in Solver+ — three distinct actions with the range grid color-coded by frequency
5 SB's Defensive Strategy
How SB responds depends entirely on which sizing BB chose. The check-raise frequency is 2.6× higher against the small bet — a critical structural feature that punishes indiscriminate range-betting.
SB Response Distribution:
Fold (44.8%): All offsuit overcards (KJo, QJo, KTo, ATo), weak suited hands (K8s, T8s, Q8s, A6s–A8s), bottom pairs (44, 22)
Call (46.9%): Sets (33, 55, 99 — slow-playing!), underpairs (66–88), top pair (T9s, J9s, 97s), suited connectors (76s, 65s, 54s), premium overcards (AQo, AJs, KQs)
Raise (8.2%): TT (89.7% raise!), A9s (96.8% raise), K9s (40.2% raise), semi-bluffs (AJs, JTs at ~15–23%)
Why sets DON'T raise the big bet: After BB bets 80%, the pot is already 49.92bb. A check-raise would create a pot of ~80.64bb with only ~44.32bb remaining — effectively committing both players. Sets prefer to keep the pot smaller and extract on later streets. The big c-bet already built the pot; raising just folds out bluffs.
SB Response Distribution:
Fold (16.8%): Only the absolute worst — KJo (83%), QJo (82%), KQo (51%)
Call (62.1%): Almost everything — 88 (97%), 44 (96%), 22 (100%), 77 (83%), AQo (97%), all decent hands
Raise (21.1%): TT (84%), A9s (83%), 33 (64%), 76s (75%!), K9s (60%), A4s (50%), 99 (40%)
The small bet unlocks set-raising. Against the 25% bet, 33 raises 64% and 99 raises 40%. Against the big bet, both were pure calls. And 76s raises 75% as a semi-bluff — gutshot (needs a 4) with excellent equity and fold equity. Every time BB bets small, they face a 21% check-raise frequency.
When SB check-raises, the hand enters a high-variance path. The XR range and BB's response differ dramatically by which sizing SB raised against.
SB raises to ~2× (~30.72bb). Pot becomes ~80.64bb with only ~44.32bb behind — SPR 0.55. Both players are functionally committed.
SB's XR Range:
| Hand | XR Freq | Role |
|---|---|---|
| TT | 89.7% | Value + protection — SB's only overpair |
| A9s | 96.8% | Value — strong top pair wants to build the pot |
| K9s | 40.2% | Value (thinner) |
| JTs | 23.0% | Semi-bluff |
| AJs | 15.6% | Semi-bluff + blockers |
| A5s / A2s | ~16-17% | Semi-bluff |
BB's Response to the XR:
| BB Hand | Facing XR | Logic |
|---|---|---|
| AA, KK | Call / 3-bet jam | Overpairs that beat TT and A9s. |
| Call | Ahead of A9s/K9s but behind TT. | |
| JJ, TT | Call (reluctant) | Pot odds demand a call but facing significant equity. |
| K9o (top pair) | Fold or call | Facing TT + A9s — dominated. Marginal at best. |
| AKs (bluff) | Fold | Overcards don't have enough equity vs XR range. |
| JTo, QTo | Fold | Overcards can't profitably continue facing a raise. |
SB raises to ~2.5× (~12bb). Pot becomes ~36bb with ~73.60bb behind — SPR ~2.04. Room for meaningful turn and river decisions.
SB's XR Range:
| Hand | XR Freq | Role |
|---|---|---|
| TT | 84% | Value + protection |
| A9s | 83% | Value |
| 33 | 64% | Nut value (set) |
| 76s | 75% | Semi-bluff — gutshot with fold equity |
| K9s | 60% | Value |
| 99 | 40% | Nut value (set) |
| A4s | 50% | Semi-bluff — ace blocker |
| Q9s | 30% | Thin value |
| 66 | 28% | Semi-bluff + equity |
BB's Response to the XR:
| BB Hand | Facing XR | Logic |
|---|---|---|
| AA, KK | Call (trapping) | AA/KK ahead of most of SB's XR range. |
| QQ, JJ | Call | Ahead of semi-bluffs, behind sets/TT. |
| TT | Call (close) | Ahead of semi-bluffs, behind sets. |
| 99 (set) | 3-bet / Call | Nutted. Can 3-bet or flat to keep bluffs in. |
| T9s (top pair) | Call (marginal) | Getting correct odds but dominated by half the XR range. |
| AQs, AKs | Fold | Overcards don't have enough equity vs 21% XR range. |
| 54s, A3o | Fold | Bottom of range. Can't profitably continue. |
Want to practice these defense frequencies until they're second nature? Postflop+ lets you play these exact spots against a GTO opponent and tracks where your frequencies diverge from optimal.
6 The Three Paths: Post-Flop Decision Tree
Three dominant paths emerge from the flop, each creating a fundamentally different dynamic for the rest of the hand.
SB checks (98.3%)
│
├── BB bets 80% pot (33.2%)
│   ├── SB folds (44.8%) — offsuit overcards, weak suited
│   ├── SB calls (46.9%) — sets, pairs 55-88, top pair, suited connectors
│   └── SB raises (8.2%) — TT (90%), A9s (97%), semi-bluffs
│       └── Turn: BB barrels overpairs on bricks, checks on overcards
│
├── BB bets 25% pot (25.4%)
│   ├── SB folds (16.8%) — only KJo, QJo, KQo
│   ├── SB calls (62.1%) — wide: all pairs, draws, broadways
│   └── SB raises (21.1%) — TT, 33, 76s, A9s, K9s, semi-bluffs
│       └── Turn: Wide ranges, thin value decisions
│
└── BB checks (41.4%) — KQs, AJs, ATs, 76s, 87s, K8o, T3s, 77, 88
    └── Turn: SB probes aggressively — BB's range is capped
7 Turn Strategy by Path
Ranges Entering Turn — Path A
After BB bet 80%, SB called. Ranges filtered by flop action.
OOP Unique (SB excess)
Common (overlap)
IP Unique (BB excess)
107.6 combos
OOP range
9 shared
overlap
79.3 combos
IP range
Pot ~49.92bb · Stacks ~75.04bb · SPR ~1.50
BB's range is polarized (overpairs + bluffs). SB's range is condensed and strong (sets, pairs, connectors). SB almost never donks — CHECK ≥78% on every card.
Turn Card Impact on BB's Strategy:
| Turn Card | BB Effect | SB Effect | BB Action |
|---|---|---|---|
| Brick (2,4,8) | Neutral | Neutral | Barrel 60-75% pot with QQ+, TT, K9o. Equity bluff with AKo/AKs. |
| Ace | Kills QQ/JJ/TT | Improves SB's Ax | Barrel AA only. Check everything else. |
| King | Improves KK, K9 | Improves SB's Kx | Barrel KK. QQ/JJ/TT must check. |
| Queen / Jack | Mixed | Both improve | Barrel the improved hand only. TT in trouble. |
| 9, 5, 3 (pairs) | Some trips | Quads/trips for SB | Bet trips for value. Check overpairs cautiously. |
| 7, 6 | Minimal | Two pairs/straights for 76s/87s | Size down slightly. SB improved more. |
The Nut-Donation Principle: Every bet is a donation into villain's nuts. When the turn gifts SB new nut combos (A, K, Q, J), your big bet donates into a range that just got stronger. On overcards: size down or check. On bricks: maintain the plan.
BB's turn range split on 9♥5♦3♣ 2♥ brick after 80% flop c-bet in Solver+
Ranges Entering Turn — Path B
After BB bet 25%, SB called. Wider ranges than Path A.
OOP Unique (SB excess)
Common (overlap)
IP Unique (BB excess)
133 combos
OOP range
14.9 shared
overlap
61.6 combos
IP range
Pot ~28.80bb · Stacks ~85.60bb · SPR ~2.97
Both ranges are wider. BB's value range is thinner and SB's calling range is more diverse. SB is even more passive than Path A — CHECK ≥99% on overcards and bricks.
| BB Hand | Turn Action | Sizing | Notes |
|---|---|---|---|
| 99 (set) | Barrel ~70% | 50-66% pot | Build pot for river stacking |
| AA | Barrel ~60% | 50-66% pot | Not vulnerable but wants to build pot |
| KK | Barrel ~55% | 50-60% pot | Must deny equity to SB's Ax overcards |
| QQ/JJ | Barrel ~50% | 50-60% pot | Same overcard problem as the flop |
| T9s | Barrel ~40% | 33-50% pot | Top pair thin value |
| 54s | Check ~60% | — | One-and-done equity denial on flop |
When BB doesn't have the nut advantage but wants to deny equity, a micro-denial bet (20–30% pot) is the right play on brick turns. It's a micro-commitment that advances equity without building an unnavigable pot.
BB's Turn Barrel Frequencies (after SB checks, which is ≥98%):
BB continues barreling 47-64% with a clear preference for 80% pot sizing.
| Turn Card | BB Check | Bet ~25% | Bet ~80% | Overbet ~135% | Total Barrel |
|---|---|---|---|---|---|
| 5♣ mid pairs | 36% | 1% | 61% | 2% | 64% |
| Q♣ overcard | 41% | — | 58% | 1% | 59% |
| K♦ overcard | 42% | 1% | 56% | 1% | 58% |
| 9♠ top pairs | 43% | 3% | 54% | 1% | 57% |
| J♣ overcard | 44% | — | 55% | 1% | 56% |
| A♥ overcard | 47% | 6% | 38% | 9% | 53% |
| 2♥ brick | 49% | 1% | 34% | 16% | 51% |
| 6♠ straight | 49% | 19% | 31% | 1% | 51% |
| 7♥ straight | 53% | 7% | 36% | 4% | 47% |
| 4♦ gutshot | 53% | 1% | 45% | 1% | 47% |
SB's Response to 80% Barrel:
SB's Response to 135% Overbet:
Ranges Entering Turn — Path C
After BB checked back. SB uncapped, BB capped.
OOP Unique (SB excess)
Common (overlap)
IP Unique (BB excess)
206.4 combos
OOP range
28.4 shared
overlap
99.8 combos
IP range
Pot 19.20bb · Stacks 90.40bb · SPR 4.71
BB's range is capped — no overpairs, no strong top pair (those all bet the flop). SB's range is completely uncapped. This is the highest-leverage node in the hand tree.
SB Turn Probe Frequencies by Card:
| Turn Card | Check | Bet 40% | Bet 95% | Bet 150% |
|---|---|---|---|---|
| Brick (2♥) | 58% | 23% | 15% | 4% |
| A♥ overcard | 98% | — | 1% | — |
| K♦ overcard | 77% | 15% | 7% | 1% |
| J♣ overcard | 51% | 34% | 14% | 1% |
| 7♥ straight | 37% | 24% | 11% | 29% |
| 6♠ straight | 35% | 21% | 21% | 23% |
| 9♠ pairs top | 46% | 17% | 17% | 20% |
Maximum aggression on straight-completing cards: 7♥ and 6♠ see 63–65% probe frequencies with 23–29% at 150% pot. SB holds 76s, 87s, 98s and can overbet credibly. On bricks, SB probes ~42% at smaller sizes.
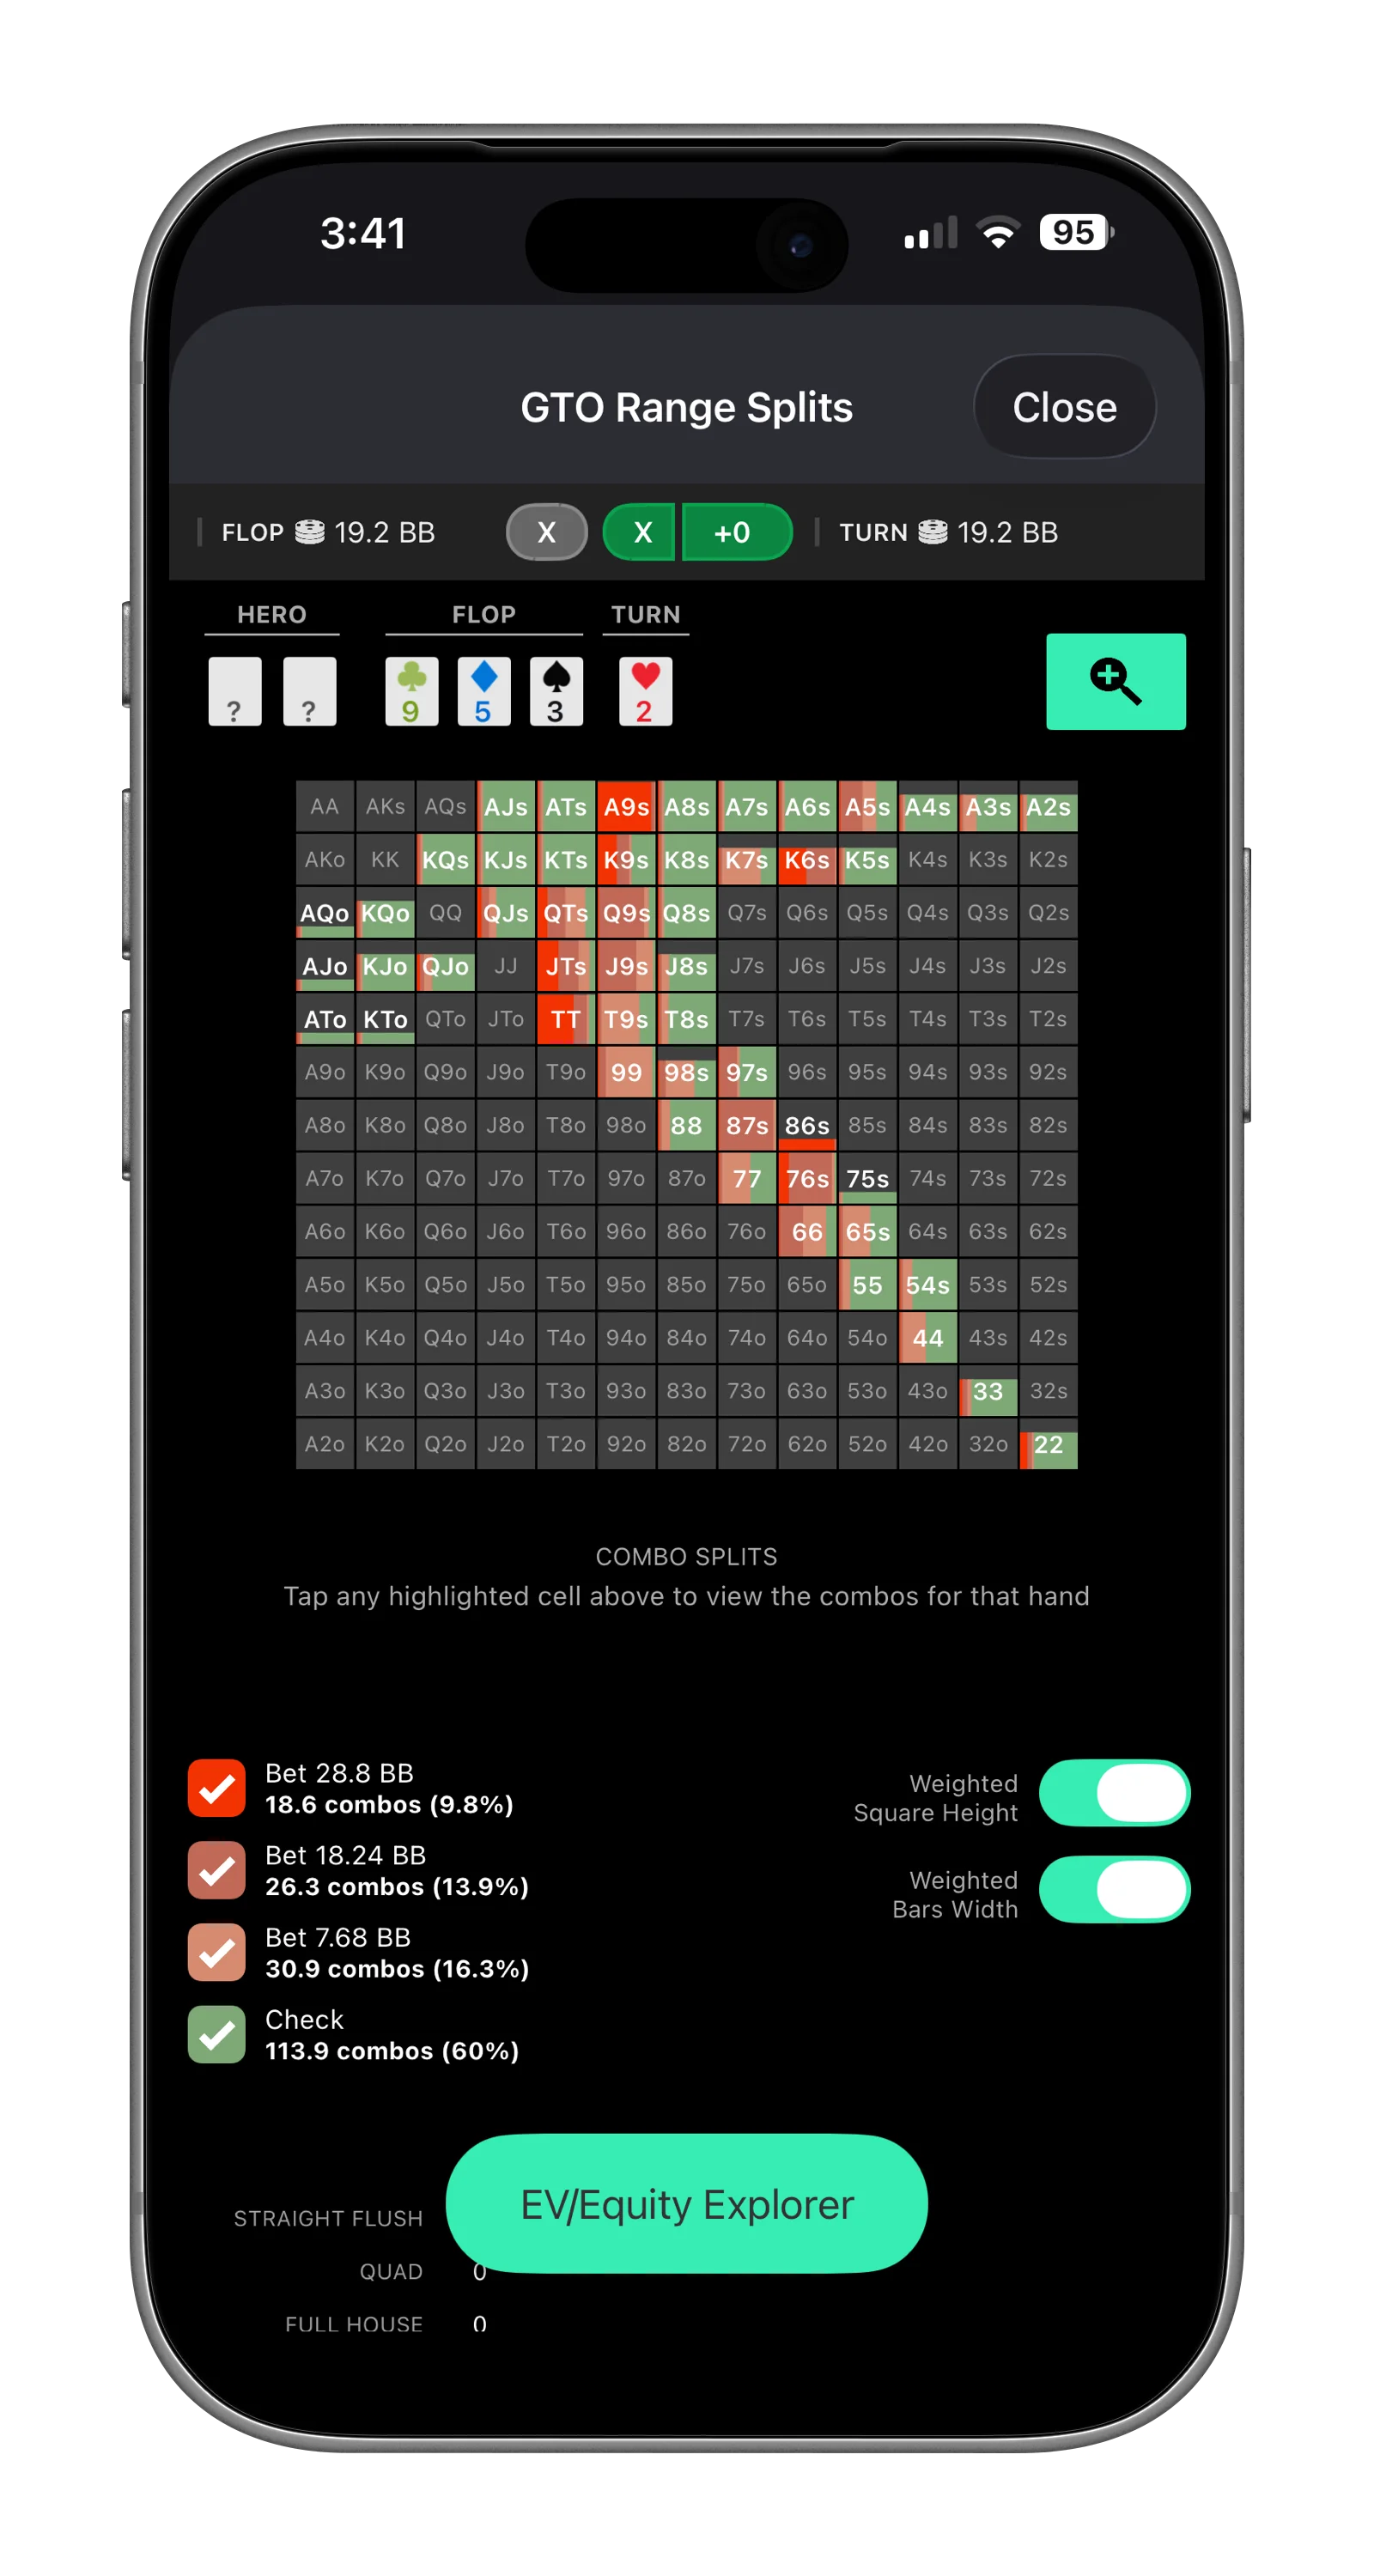
SB's turn probe split after BB's check-back on 9♥5♦3♣ 2♥ in Solver+ — four sizes plus check
SB Probe Hands (Brick Turn):
| Hand | Probe Freq | Sizing | Logic |
|---|---|---|---|
| TT | 60-75% | 33-50% pot | Hidden overpair. Value probe against capped range. |
| 99, 55, 33 | 65-85% | 25-33% pot | Sets. Small value probe. No protection needed. |
| A9s, K9s | 70-85% | 33-50% pot | Top pair. Aggressive probe against capped range. |
| 88, 77 | 50-65% | 25% pot | Equity denial micro-bet. Deny BB's overcard outs. |
| 76s, 65s | 55-65% | 25-33% pot | Gutshot + overcards (76s) / pair + gutshot (65s). Good probe hands with equity. |
| KQs, AJs | 40-60% | 25-33% pot | Semi-bluff probe. Strong candidates for probing a capped range. |
Path D Turn: After SB Check-Raised the Flop
SB's XR ranges and BB's responses are covered in Section 5. Here we focus on turn continuation after the raise.
Ranges Entering Turn — Path D (XR vs 80%)
After SB check-raised BB's 80% bet, BB called. SPR 0.55.
OOP Unique (SB excess)
Common (overlap)
IP Unique (BB excess)
17.1 combos
OOP range
1.9 shared
overlap
12.5 combos
IP range
Turn After XR vs Big Bet — Effectively Committed
Pot ~80.64bb with ~44.32bb behind. SPR 0.55. Nearly every hand either jams or check-folds.
| Hand | Turn Action | Logic |
|---|---|---|
| TT | Jam any turn | Must deny before overcards arrive. Only loses to sets. |
| A9s | Jam bricks, check overcards | Strong TPTK. Check A/K/Q turns that scare. |
| K9s | Jam bricks | Top pair. Fold to 3-bet if BB came over the top on flop. |
| JTs | Jam on gin cards (Q, 8) | Check-fold blanks. Semi-bluff budget spent. |
| AJs | Jam if A or J lands | Check-fold blanks. Bluffing budget exhausted. |
| A5s / A2s | Jam if A or wheel card hits | Give up on blanks. |
Turn is simplified at SPR 0.55: No thin value, no block betting — the pot is too committed for nuance. Jam value, check-fold missed semi-bluffs.
Ranges Entering Turn — Path D (XR 1200 vs 25%)
After SB raised to 12bb vs BB's 25% bet, BB called.
OOP Unique (SB excess)
Common (overlap)
IP Unique (BB excess)
34 combos
OOP range
7.5 shared
overlap
38.9 combos
IP range
Turn After XR vs Small Bet — Room to Maneuver
Pot ~36bb with ~73.60bb behind. SPR ~2.04. Genuine decisions about barrel sizing and card impact.
SB's Turn Continuation by Hand:
| Hand | Turn Action | Logic |
|---|---|---|
| TT | Barrel 60-75% pot on bricks | Check overcards. Still the must-protect overpair. |
| A9s | Barrel bricks for value | On A turn → bet big (two pair). Check bad overcards. |
| 33, 99 | Barrel 50-66% on any turn | Three streets of value. Can slow-play bricks to let BB catch up. |
| 76s | Barrel on 4 (straight completes) | Check-evaluate blanks — 7-high has minimal SDV. Give up on overcards. |
| K9s | Barrel bricks 50-60% pot | On K turn → bet big (two pair). Cautious on A turn. |
| A4s | Barrel if A hits or straight completes | Check-fold blanks. Ace blocker helps as bluff. |
| Q9s | Barrel bricks cautiously 33-50% | Check overcards. |
| 66 | Barrel selectively | Check most turns for SDV. |
Turn Card Impact After XR vs Small:
| Turn Card | SB Strategy | Logic |
|---|---|---|
| Brick (2,4,8) | Barrel 60-70% with TT/A9s/sets/K9s. Semi-bluff 76s on 4/8. | Nothing changed. SB's range advantage holds. Apply pressure. |
| Ace | Barrel A9s (now two pair). Check TT/K9s. A4s improves. | Ace helps SB's A9s and A4s but hurts TT badly. Polarize: bet improved hands, check the rest. |
| King | Barrel K9s (now two pair). Check most others. TT cautious. | K benefits K9s dramatically. SB can overbet with K9s for value. |
| Queen / Jack | Barrel TT for protection. Sets continue. Semi-bluffs check. | Overcards threaten TT — must continue denying. 76s loses value as a barrel. |
| 6 or 7 | 76s barrels big (two pair/straight). All value continues. | Best card for SB's semi-bluff region. 76s becomes nutted. |
| 9, 5, 3 (pairs board) | Sets → quads/full house (bet big). TT/A9s check cautiously. | Board pairing favors SB's set-heavy XR range enormously. |
The key difference between the two XR paths: vs the big bet, SB's range is narrow (TT + A9s dominated) and the pot is committed — turn play is automatic. Vs the small bet, SB's range is wider and includes sets + semi-bluffs with SPR ~2.04 remaining — turn play involves genuine decisions about barrel sizing, card impact, and whether semi-bluffs continue or give up.
8 River Strategy: Solver Data & Heuristics
At the river, every hand falls into exactly one of five classes. The classification determines your mandatory play — there's no judgment call, just execution.
| Class | Description | Equity | Mandatory Play |
|---|---|---|---|
| A — Nuts | Cannot lose | ~100% | Distribute across all bet sizes |
| B — Thick Value | Beats villain's thinnest value bet | ~80% | Can trap (check-raise) or bet for value |
| C — Thin Value | Loses to villain's thinnest value bet | ~55-66% | Mandatory block bet (OOP) or standard bet (IP) |
| D — Showdown | Too weak to bet, wins at showdown | ~30-50% | Mandatory check |
| E — Air | Can only win by bluffing | ~0% | Fill bluff "suitcase" from bottom of range up |
🔑 THE TWO CRITICAL BOUNDARIES
B vs C: Ask "What is villain's thinnest value bet if I check?" If your hand beats it → Class B (can trap). If your hand loses to it → Class C (must bet). On this board, villain's thinnest value bet is typically Q9s or J9s. If you beat Q9s (e.g., K9s), you're Class B. If you lose to it (e.g., 88), you're Class D.
D vs E: Ask "What is my strongest bluff?" Below this hand → Class E (bluff candidate). Above → Class D (mandatory check). On this board, 22 or 44 are often the boundary — below them is pure air.
River Principles for This Spot
OOP Block Bet Theory (SB):
- Thin value → mandatory block bet (10-33% pot)
- Sizing follows equity: 55% = 10% pot, 60% = 25%, 66% = 33%
- Include traps (sets) in checking AND betting ranges
- Trap ratio shifts to ~1:2 at 25% pot block bet
- Never jam thin value — small bets maximize profit
IP Rules (BB):
- Never bet below 50% pot — break-even threshold for reopening
- Default sizing: 66-75% pot for both value and bluffs
- Overbet only with surplus nuts on dramatic rivers
- Check back all SDV — IP can end the hand for free
River by Path — Solver Data
Path A River: After BB Bet 80% Flop, SB Called
Two sub-scenarios depending on what happened on the turn. When BB checks the turn, their range is capped — no overpairs or strong value stayed passive. SB's range is uncapped.
Ranges Entering River — Path A (x/x Turn, K♦)
After BB bet 80% flop → SB call → both check turn.
OOP Unique (SB excess)
Common (overlap)
IP Unique (BB excess)
103.5 combos
OOP range
2.2 shared
overlap
37.8 combos
IP range
SB's River Action After Both Check Turn (Pot ~49.92bb, Stacks ~75.04bb):
Board: 9♥ 5♦ 3♣ 2♥ (brick turn)
| River Card | Check | Bet ~40% | All-In | Pattern |
|---|---|---|---|---|
| 2♦ double brick | 39% | 60% | — | Best probe card — nothing changed, BB's capped range can't call |
| K♦ overcard | 62% | 37% | 1% | Medium bet, less polarized |
| A♥ overcard | 71% | 4% | 25% | Polarized — SB has Ax that improved, goes all-in or gives up |
| 7♠ straight | 54% | 23% | 23% | Split sizing — straights jam, thin value bets small |
| 4♦ connects | 88% | 1% | 12% | Check-heavy — 4 connects draws, gives BB combos |
| T♣ overcard | 91% | 4% | 5% | Near-pure check — T improves BB's TT |
Board: 9♥ 5♦ 3♣ 7♥ (straight-completing turn)
| River Card | Check | Bet ~40% | All-In |
|---|---|---|---|
| 6♠ completes | 36% | 60% | 4% |
| 8♦ completes | 38% | 48% | 15% |
| A♥ overcard | 79% | 2% | 19% |
| 2♦ brick | 62% | 38% | 1% |
Key Pattern: Sizing Is Polarized
SB uses either ~40% pot or all-in with almost nothing in between. This is the hallmark of a range-vs-capped-range river: SB has the nuts or nothing. Straight-completing rivers (6♠, 8♦ after 7♥ turn) see 62-64% continuation — SB holds 76s, 87s, 98s and barrels credibly.
Ranges Entering River — Path A (BB Barrel Turn, K♦)
After BB bet 80% flop → SB call → BB barrel turn → SB call.
OOP Unique (SB excess)
Common (overlap)
IP Unique (BB excess)
82.2 combos
OOP range
2.3 shared
overlap
9.7 combos
IP range
When BB Triple-Barrels (Flop 80% → Turn Barrel → River Bet):
SB's calling range has been filtered to sets, strong pairs, and the best bluff-catchers. This is the most polarized river spot in the entire hand tree.
| SB Hand | Class | vs 66% Pot | vs Pot Bet | vs Overbet | Blockers |
|---|---|---|---|---|---|
| 99, 55, 33 | A/B — Nuts | Call/Raise | Call/Raise | Call | Blocks 9x/5x/3x value |
| TT (rare) | B — Thick | Call | Call | Call cautiously | Blocks TT combos |
| Q9s, T9s | C/D — Bluff-catcher | Call if unblocks bluffs | Fold lean | Fold | Blocks QQ/TT value |
| 88, 77, 66 | D — SDV | Fold | Fold | Fold | No positive blockers |
| 76s, 65s (bricked) | E — Air | Bluff if no SDV | Bluff | Bluff | Unblocks BB's folds |
| AQo, KQs | D — SDV | Fold | Fold | Fold | Blocks value = negative |
Blocker Selection Guide (SB's Calling Decisions):
| Holding | Effect | Action |
|---|---|---|
| A 9 | Blocks BB's 9x value (K9, Q9, T9) | Call more |
| An A | Blocks BB's AA | Call more |
| A K | Blocks BB's KK | Call slightly more |
| A Q | Blocks QQ but also QTo bluffs | Neutral |
| A J | Blocks JJ and JTo bluffs | Fold lean |
Ranges Entering River — Path A (BB Barrel Turn, K♦)
After BB bet 80% flop → SB call → BB barrel turn → SB call.
OOP Unique (SB excess)
Common (overlap)
IP Unique (BB excess)
82.2 combos
OOP range
2.3 shared
overlap
9.7 combos
IP range
BB Acts on River After Triple-Barrel Line (SPR ~0.83):
Board: 9♥ 5♦ 3♣ 2♥. BB bet 80% flop → barreled turn → acts on river. Only sizing is all-in.
| River Card | BB CHECK | BB ALL-IN |
|---|---|---|
| A♥ overcard | 48% | 52% |
| K♦ overcard | 25% | 75% |
| T♣ overcard | 22% | 78% |
| 7♠ straight | 39% | 61% |
| 4♦ connects | 44% | 56% |
| 2♦ double brick | 32% | 68% |
Key Pattern: Shove Frequency by River Card
T♣ and K♦ trigger the highest shove frequencies (75-78%) — these overcards don't improve SB's calling range. A♥ is the lowest shove at 52% because the Ace improves some of SB's remaining hands (A9s, A5s).
Ranges Entering River — Path A (x/x Turn, K♦)
After BB bet 80% flop → SB call → both check turn.
OOP Unique (SB excess)
Common (overlap)
IP Unique (BB excess)
103.5 combos
OOP range
2.2 shared
overlap
37.8 combos
IP range
BB Responds to SB's River Bet (After Both Check Turn):
Board: 9♥ 5♦ 3♣ 2♥. Both checked turn → SB bets ~40% pot on river → BB responds.
| River Card | SB Bet Size | BB Fold | BB Call | BB Raise/AI |
|---|---|---|---|---|
| K♦ overcard | ~40%p | 39% | 36% | 24% |
| 7♠ straight | ~40%p | 54% | 29% | 17% |
| 2♦ double brick | ~40%p | 62% | 17% | 21% |
Key Pattern: BB's Delayed Aggression
BB folds 39-62% overall. The 2♦ brick triggers the highest fold frequency (62%) — BB's capped range has nothing to call with on a blank runout. BB raises 17-24% with sets and two-pair that checked back the turn for deception.
Path B River: After BB Bet 25% Flop, SB Called
SB checks the turn ≥98% of the time. The river plays out very differently depending on whether BB barreled or checked behind on the turn.
Ranges Entering River — Path B (x/x Turn, K♦)
After BB bet 25% flop → SB call → both check turn.
OOP Unique (SB excess)
Common (overlap)
IP Unique (BB excess)
131 combos
OOP range
11 shared
overlap
32.4 combos
IP range
Both Check Turn (2♥ brick) → SB Acts on River
Pot 28.80bb, stacks 85.60bb. BB's turn check capped their range — SB can probe with value.
| River Card | Check | Bet ~40% | Bet ~95% | All-In | Pattern |
|---|---|---|---|---|---|
| T♣ overcard | 30% | 42% | 28% | — | Strongest bet card — T doesn't help BB's capped range |
| 7♠ straight | 37% | 38% | 19% | 6% | Draw-completing — SB's straights arrive |
| 2♦ double brick | 52% | 29% | 19% | — | Standard — nothing changed, moderate bet |
| A♥ overcard | 66% | — | 4% | 30% | Polar — 30% all-in or give up. A9s/AJs improved to nuts. |
| K♦ overcard | 71% | 28% | — | — | Small-only — SB block-bets with Kx and medium pairs |
| 4♦ connects | 86% | — | — | 14% | Check-heavy with all-in kicker — nuts shove, rest give up |
SB's Block Bet Ladder (this check-through line):
| SB Hand | Equity | Block Bet Size | Logic |
|---|---|---|---|
| Pair of 3s (A3s) | ~55% | 10% pot | Weakest thin value. Beats only air. |
| Pair of 5s (65s, 54s) | ~58% | 15-20% pot | Slightly stronger. Beats air + weak pairs. |
| 97s (TP weak kicker) | ~62% | 25% pot | Solid thin value. |
| T9s (top pair) | ~65% | 25-33% pot | Stronger thin value. |
| Q9s (TP good kicker) | ~68% | 33% pot | Transitioning toward standard bet. |
| K9s (TP strong kicker) | ~72% | 33-50% pot | Thick value territory. |
| A9s (TPTK) | ~78% | 50% pot | Standard value bet, not a block. |
| 99 (set) | ~90%+ | 66-100% pot | Class A. Max value extraction. |
The most commonly missed play at NL100-500: Block-betting thin value on low boards. Pairs of 3s and pairs of 5s on 9-high boards should block-bet but are almost always checked.
Bluff Selection — The Inversion Rule:
Prefer hands with one overcard + busted backdoor over two overcards. Two-overcard hands (KQo) have too much SDV to waste as bluffs AND they block the opponent's folding range.
BLUFF SUITCASE ORDER (fill from the bottom up):
Ranges Entering River — Path B (BB Barrel Turn, K♦)
After BB bet 25% flop → SB call → BB barrel turn → SB call.
OOP Unique (SB excess)
Common (overlap)
IP Unique (BB excess)
73.1 combos
OOP range
3.2 shared
overlap
20.5 combos
IP range
BB Barrels 80% Turn → SB Calls → SB Acts on River
Board 9♥5♦3♣ 2♥. Pot ~74.37bb, stacks ~62.61bb. SPR ~0.84 — effectively committed. The only sizing is check or shove.
| River Card | Check | All-In | Pattern |
|---|---|---|---|
| A♥ overcard | 51% | 49% | Only shove card — A9s improved to trips, A5s/A3s made two pair |
| K♦ overcard | 100% | — | Pure check |
| 7♠ straight | 100% | — | Pure check |
| T♣ overcard | 100% | — | Pure check |
| 2♦ double brick | 100% | — | Pure check |
| 4♦ connects | 91% | 9% | Near-pure check — rare shove with nutted hands only |
Deep-Street Pot Geometry Confirmed
At SPR ~0.84, SB's range is already defined — hands that called the turn barrel are sets and strong pairs that want to check-call BB's potential third barrel, not lead into it. Only the Ace triggers a shove (49%) because it dramatically improves SB's calling range.
Ranges Entering River — Path B (x/x Turn, K♦)
After BB bet 25% flop → SB call → both check turn.
OOP Unique (SB excess)
Common (overlap)
IP Unique (BB excess)
131 combos
OOP range
11 shared
overlap
32.4 combos
IP range
BB Acts on River After x/x Turn (SB Checks to BB):
Board: 9♥ 5♦ 3♣ 2♥. BB bet 25% flop → SB call → x/x turn → SB checks river → BB acts. Pot 28.80bb, stacks 85.60bb.
| River Card | BB CHECK | BB BET ~35%p | BB BET ~90%p | BB ALL-IN |
|---|---|---|---|---|
| A♥ overcard | 68% | 4% | 27% | 1% |
| K♦ overcard | 57% | 2% | 40% | 1% |
| 7♠ straight | 59% | 2% | 39% | — |
| 4♦ connects | 47% | 45% | 5% | 3% |
| T♣ overcard | 63% | 6% | 26% | 5% |
| 2♦ double brick | 61% | 4% | 30% | 5% |
Key Pattern: Sizing Selection by River Card
K♦ is BB's best bet card (43% total, 40% at 90% pot) — the King doesn't improve SB's range. 4♦ is uniquely a small-bet card (45% at 35% pot) because it connects draws and BB wants thin value. All other river cards default to 90% pot as the primary sizing.
Path C River: After BB Check-Back — Three Solver Scenarios
Path C produces the widest ranges and most varied river spots. The solver was queried on three distinct scenarios.
Ranges Entering River — Path C (x/x Turn, K♦)
After x/x flop → x/x turn. Maximum range width.
OOP Unique (SB excess)
Common (overlap)
IP Unique (BB excess)
119.2 combos
OOP range
15.1 shared
overlap
45.3 combos
IP range
Both check flop AND turn (x/x/x/x). SB acts on river.
Board: 9♥ 5♦ 3♣ 2♥. Pot 19.20bb, stacks 90.40bb. Ranges are very wide — this is thin-value paradise.
| River Card | Check | Bet 40% | Bet 95% | Bet 150% |
|---|---|---|---|---|
| K♦ overcard | 51% | 43% | 6% | — |
| J♣ overcard | 56% | 44% | — | — |
| T♣ overcard | 53% | 26% | 14% | 7% |
| A♥ overcard | 72% | 18% | 1% | 10% |
| 7♠ straight | 63% | 15% | 3% | 17% |
| 4♦ connects | 89% | 10% | — | 1% |
K♦ and J♣ are the best probes (43-44% bet, mostly small). A♥ and 4♦ are check-heavy.
Ranges Entering River — Path C (Probe→Call, K♦)
After x/x flop → SB probe → BB call.
OOP Unique (SB excess)
Common (overlap)
IP Unique (BB excess)
50 combos
OOP range
11.7 shared
overlap
64.1 combos
IP range
SB probed 40% pot on 2♥ brick, BB called. SB acts on river.
Pot 34.56bb, stacks 82.72bb. This is the critical line — SB continues far more often than "one-and-done."
| River Card | Check | Bet 40% | Bet 95% | All-In |
|---|---|---|---|---|
| 7♠ straight | 15% | 49% | 29% | 7% |
| T♣ overcard | 34% | 52% | 15% | — |
| 2♦ double brick | 38% | 54% | 8% | — |
| K♦ overcard | 64% | 36% | — | — |
| A♥ overcard | 68% | 1% | 25% | 6% |
| 4♦ connects | 81% | — | 1% | 18% |
"One-and-Done" Probe is NOT GTO
SB continues on 5 of 6 river cards tested, often above 50%. The solver strongly disagrees with giving up after probing. Key patterns:
7♠ = strongest continuation — 85% bet across all sizes (7% all-in). Straight completers are the best barrel cards.
T♣ and 2♦ = strong continuations — 62-67% bet. Run-outs that don't change the board favor the aggressor.
K♦ = small-only continuation — 36% bet, all at 40% pot.
A♥ = polar — 32% bet, but skips small sizing (25% at 95%, 6% all-in).
4♦ = check-heavy — 81% check. The 4 connects too many draws.
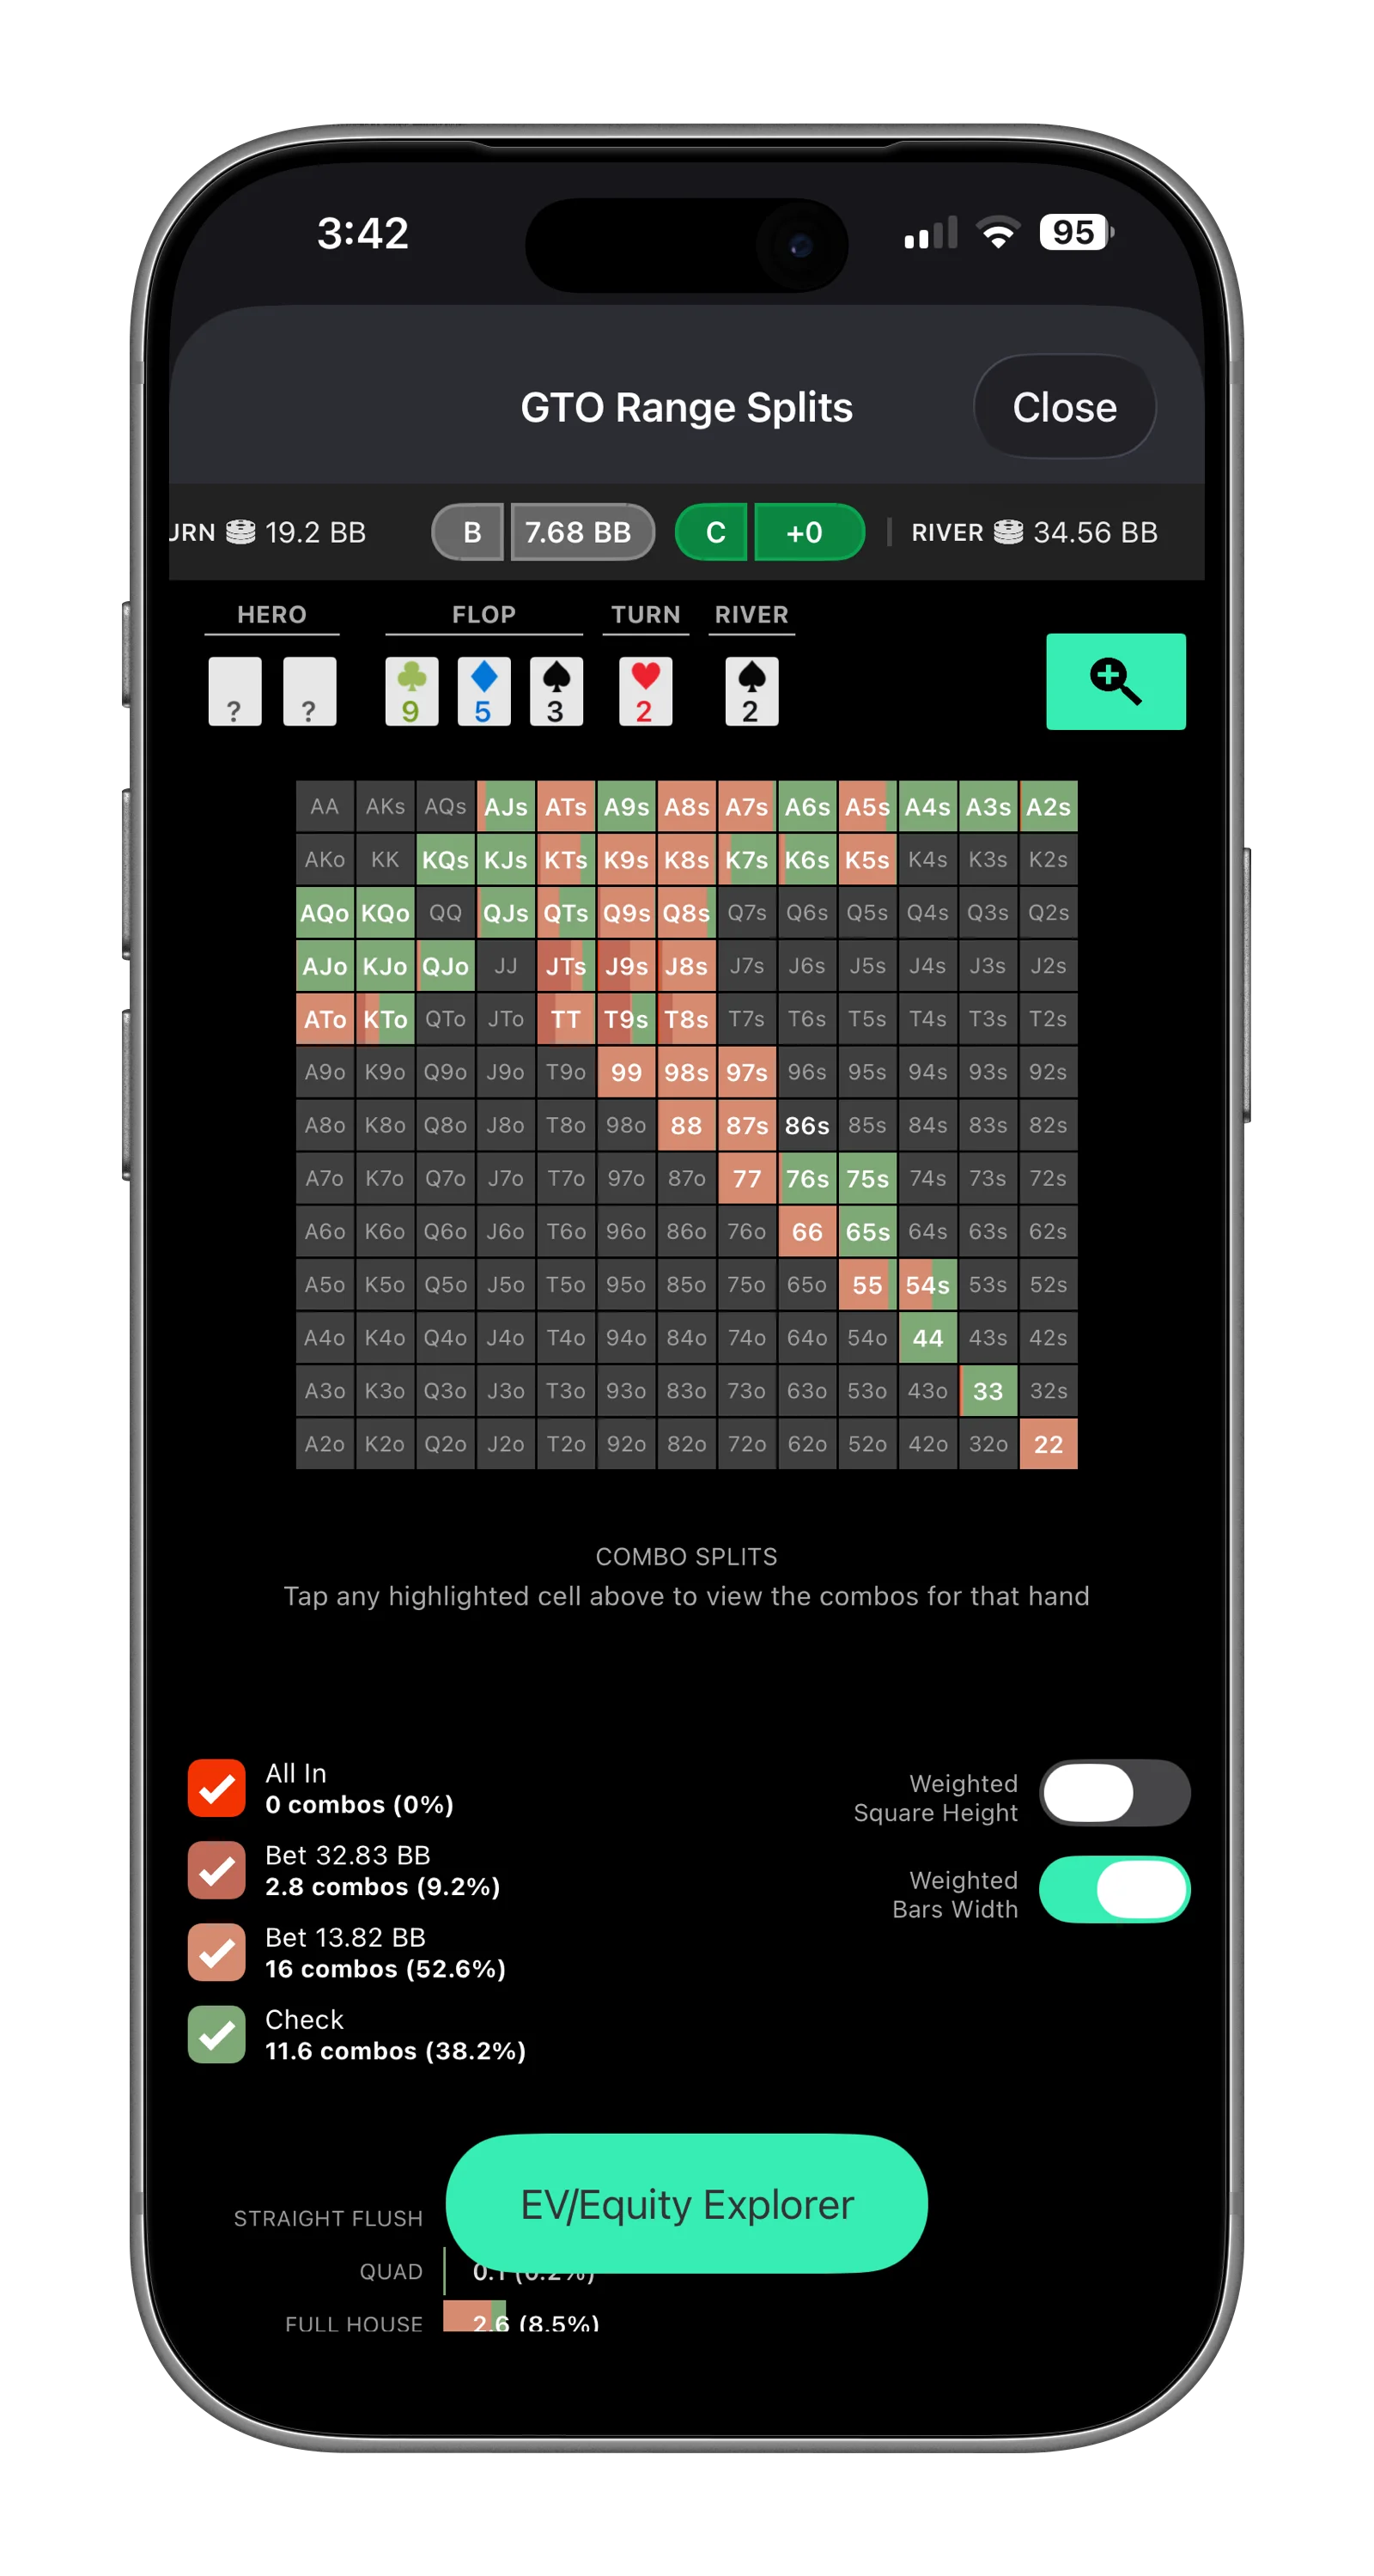
SB's river range split after probe→call on brick runout in Solver+ — continuation far from "one-and-done"
Ranges Entering River — Path C (9♠ Turn, K♦)
After x/x flop → x/x 9♠ turn. Board paired.
OOP Unique (SB excess)
Common (overlap)
IP Unique (BB excess)
93.9 combos
OOP range
11.2 shared
overlap
55.4 combos
IP range
OOP Unique (SB excess)
Common (overlap)
IP Unique (BB excess)
93.9 combos
OOP range
11.2 shared
overlap
55.4 combos
IP range
BB Acts on River After Calling SB's Turn Probe:
Board: 9♥ 5♦ 3♣ 2♥. x/x flop → SB probed 40% turn → BB called → SB checks river → BB acts. Pot 34.56bb, stacks 82.72bb.
| River Card | BB CHECK | BB BET ~35%p | BB BET ~90%p | BB ALL-IN |
|---|---|---|---|---|
| A♥ overcard | 63% | 4% | 22% | 11% |
| K♦ overcard | 56% | 3% | 30% | 12% |
| 7♠ straight | 63% | 1% | 35% | 2% |
| 4♦ connects | 56% | 3% | 40% | 1% |
| T♣ overcard | 64% | 2% | 26% | 9% |
| 2♦ double brick | 62% | 1% | 27% | 10% |
Key Pattern: BB's Delayed Value After Calling Probe
4♦ is BB's best bet card (44% total, mostly at 90% pot). K♦ triggers 42% betting with 12% all-in — overcards that improve BB's range. All river cards use 90% pot as the primary sizing, with all-in reserved for the strongest holdings.
Ranges Entering River — Path C (x/x Turn, K♦)
After x/x flop → x/x turn. Maximum range width.
OOP Unique (SB excess)
Common (overlap)
IP Unique (BB excess)
119.2 combos
OOP range
15.1 shared
overlap
45.3 combos
IP range
BB Acts on River After x/x/x/x (Both Check Flop AND Turn):
Board: 9♥ 5♦ 3♣ 2♥. Both check flop AND turn → SB checks river → BB acts. Pot 19.20bb, stacks 90.40bb.
| River Card | BB CHECK | BB BET ~35%p | BB BET ~90%p | BB BET ~150%p | BB ALL-IN |
|---|---|---|---|---|---|
| A♥ overcard | 49% | 30% | 16% | 3% | 3% |
| K♦ overcard | 51% | 24% | 21% | 4% | — |
| 7♠ straight | 58% | 16% | 26% | — | — |
| 4♦ connects | 50% | 46% | 1% | 1% | 2% |
| T♣ overcard | 59% | 9% | 31% | 1% | — |
| 2♦ double brick | 58% | 15% | 20% | 7% | — |
Key Pattern: Wide Sizing Spread After Four Checks
4♦ is the small-bet card (46% at 35% pot). A♥ has the broadest sizing spread — 51% betting across all sizes as AA finally fires after checking twice. T♣ is a medium-bet card (41% total, 31% at 90% pot). With deep stacks and wide ranges, BB uses the full sizing menu.
SB's River Hand Table (After Probe → Call Line, Brick Run-Out):
| SB Hand | Class | River Action | Sizing | Notes |
|---|---|---|---|---|
| 99, 55, 33 | A — Nuts | Value bet | 66-100% pot | Max value. BB called probe with medium hand. |
| TT | B — Thick | Value bet | 50-75% pot | Strong overpair. BB cannot have better. |
| A9s | B — Thick | Value bet | 50-66% pot | TPTK. Beats BB's entire calling range. |
| K9s | B/C | Value bet | 33-50% pot | Thin value territory. Size by equity. |
| Q9s | C — Thin | Block bet | 25-33% pot | Mandatory block bet. |
| T9s | C — Thin | Block bet | 25% pot | Thinnest value. Small block. |
| 88, 77, 66 | D — SDV | Check | — | Too weak to get called by worse. |
| 76s (gutshot) | D — SDV | Check | — | 7-high with busted gutshot. Marginal SDV — don't bluff. |
| KQs (missed) | E — Air | Bluff | 50-75% pot | Blocks KK value. Good bluff. |
| QJo (missed) | E — Air | Bluff | 50-66% pot | Bottom of range. Fill suitcase. |
| A6s (missed) | E — Air | Bluff | 50-66% pot | Blocks AA value. |
BB's River Strategy (IP, After Calling SB's Turn Probe):
| BB Action When Checked To | Hands | Notes |
|---|---|---|
| Bet for value | Any top pair or better | Standard value bet at 66-75% pot |
| Check back | Overcards that floated (KQs), low suited hands (76s, 87s), pure air | SDV — end the hand for free |
| Bluff (rare) | Hands that unblock SB's folds | Solver bluffs at low frequency with total air that can't win at showdown |
Path D River: After SB Check-Raised the Flop
The river after a check-raise depends entirely on which flop sizing SB raised against. The two paths diverge dramatically.
Ranges Entering River — Path D XR vs 80% (K♦)
After SB XR vs 80% → BB call → x/x turn. SPR 0.55.
OOP Unique (SB excess)
Common (overlap)
IP Unique (BB excess)
8.3 combos
OOP range
0.4 shared
overlap
2.2 combos
IP range
SPR was 0.55 entering the turn — most hands resolved before the river.
After SB's flop XR and a turn jam or call, remaining stacks are minimal. The river is almost always an all-in or a trivial decision.
| SB Hand | Class | River Action | Notes |
|---|---|---|---|
| TT | A/B — Nuts | Jam remaining stack | SB's overpair — always gets it in. Only loses to sets that slow-played. |
| A9s | B — Thick | Jam remaining stack | TPTK. Ahead of BB's entire continuing range except overpairs. |
| K9s | B/C | Jam if improved, check if not | On K river → jam (two pair). On blanks → thin jam at this SPR. |
| JTs (bricked) | E — Air | Jam as bluff if missed | Busted straight draw. Last chance to represent the overpair line. |
| AJs (bricked) | D/E | Check-fold | A-high has marginal SDV at this pot size. Not enough to bluff with. |
In practice, this river rarely happens. At SPR 0.55, the turn action (jam or fold) resolves 90%+ of hands. The remaining river spots are trivial: if you have value, put it in. If you have air, your last bluff chance is a small remaining stack shove.
Ranges Entering River — Path D (XR → Barrel, K♦)
After SB XR vs 25% → BB call → SB barrel turn → BB call.
OOP Unique (SB excess)
Common (overlap)
IP Unique (BB excess)
16.8 combos
OOP range
3.3 shared
overlap
26 combos
IP range
SPR ~2.0 entering the turn → ~0.8-1.2 entering the river after a turn barrel.
This path produces meaningful river decisions. After SB's flop XR (to ~12bb) and a turn barrel (~50-66% pot), the pot is ~72-84bb with ~36-52bb behind. SB's range is polarized between value that barrelled and semi-bluffs that continued.
SB's River Strategy (After XR Flop → Barrel Turn → River):
| SB Hand | Class | River Action | Sizing | Notes |
|---|---|---|---|---|
| 33, 99 (sets) | A — Nuts | Jam | All-in | Three streets of value complete. Jam remaining stack on any river. |
| TT | A/B — Nuts | Jam on blanks, check overcards | All-in / Check | On A/K/Q river, TT loses to improved hands. Check and evaluate. On bricks, jam for value. |
| A9s | B — Thick | Value bet / Jam | 66-100% pot | On A river → two pair, jam. On blanks → value bet. On K/Q → cautious bet. |
| K9s | B/C | Value bet on K, block bet on blanks | 50-66% pot | On K river → two pair, jam. On blanks → thin value at 50%. On A → check. |
| Q9s | C — Thin | Block bet on blanks | 33% pot | Thin value. Beats BB's bluff-catchers but loses to overpairs that called. |
| 76s (hit straight) | A — Nuts | Jam | All-in | If 4 arrived on turn or river → nutted. Jam for max value. |
| 76s (missed) | E — Air | Bluff or give up | 66-100% pot | Busted gutshot. Best bluff candidate — unblocks BB's folds and blocks nothing. |
| A4s (missed) | E — Air | Bluff | 66-100% pot | Busted draw with ace blocker. Blocks AA in BB's range → good bluff. |
| 66 (missed) | D — SDV | Check-fold | — | Underpair with SDV. Don't turn into a bluff — pair of 6s only beats air if called. |
BB's River Defense (After Calling XR + Turn Barrel):
| BB Hand | River Action | Notes |
|---|---|---|
| AA, KK | Call any sizing | Top of range. Beats TT, A9s, K9s. Only loses to sets. |
| QQ, JJ | Call on blanks, fold on A/K | Ahead of SB's bluffs. On A/K rivers, SB's value range improves — tighten up. |
| TT | Marginal call | Splitting with SB's TT, behind sets. Blocker to TT value is positive — call lean. |
| 99 (set) | Call / raise | Nutted. Snap call or raise for max value. |
| T9s (top pair) | Fold to jam, call small | Facing a polarized range. T9s is a bluff-catcher at best. Fold to large sizing. |
River After XR vs Small: The Polarization Payoff
SB's check-raise on the flop set up a three-street value plan for sets and TT, with semi-bluffs (76s, A4s) as the natural bluff candidates. By the river, the range is cleanly polarized: nuts or air. Sets and TT jam for value. Missed draws either bluff (if they have good blockers) or give up. There's very little thin value — the XR path compresses the hand into a binary decision.
Solver-Based River Calling Framework
Before calling any river bet, evaluate using pot odds and blocker logic — not just hand strength:
- What pot odds are you getting? (This determines the equity threshold for a profitable call.)
- Does your hand block villain's value range? (Blocking value → their bet is more likely a bluff → call.)
- Does your hand block villain's bluff candidates? (Blocking bluffs → their bet is more likely value → fold.)
- Is villain's value range plausibly present on this runout? (If the board didn't change, the flop/turn ranges persist.)
- Does your hand have enough equity against villain's full betting range? (Use the 5-class framework above.)
Blocker logic > raw hand strength at the river.
A hand that blocks villain's value (holding a 9 on this board) is a better call than a hand that blocks villain's bluffs (holding a J), even if the J-hand is "stronger" in absolute terms.
Position-Dependent River Play: OOP vs IP
OOP (SB) River Play
- Use multiple block-bet sizes (10%, 25%, 33% pot)
- Include traps in checking range to prevent overbets
- Bluff from the absolute bottom of range upward
- When facing a bet: sort by blocker profile, not hand strength
- Never jam thin value — small bets maximize profit
IP (BB) River Play
- Never bet below 50% pot — break-even for reopening
- Default sizing: 66-75% pot for value and bluffs
- Overbet only with surplus nuts on dramatic rivers
- When checked to: bet if you can fold better OR get called by worse
- Check back all SDV — IP ends the hand for free
The asymmetry is fundamental: OOP uses many sizes (block-betting is mandatory, different equities demand different sizes). IP uses one or two sizes (the 50% pot floor eliminates small bets, and the polar structure demands uniformity).
9 Quick Reference Cheat Sheet
Board Texture Classification
When you see similar boards at the table, classify them immediately using this framework:
| Board | Type | Default Sizing | Exception? |
|---|---|---|---|
| 9-5-3r (this study) | B — Small or Check | 25% range-bet or check | Yes — overpairs bet 80% |
| 9-5-2r | B — Small or Check | Same as 953r | Same exception |
| 7-4-2r | B — Small or Check | 25% range-bet | Overpairs need big sizing |
| 8-6-3r | B — Small or Check | 25-35% range-bet | More connected — slightly more draws |
| 9-5-3 two-tone | B + charge | 25-50% by flush draws | Charge axis activates |
| A-K-2r | A — Big or Nothing | 75%+ polar or check | No exception |
Common Misconceptions
| Misconception | Reality |
|---|---|
| "BB should range-bet small on dry boards" | Wrong. BB uses TWO sizes on 953r. Range-betting 25% leaves QQ/JJ/TT fatally vulnerable to overcards. |
| "Always check-raise sets on the flop" | Wrong vs the big sizing. Sets slow-play 100% vs 80% pot. But they DO raise vs 25% (33 raises 64%). |
| "TT should just call — it's not strong enough to raise" | Wrong. TT raises 90% vs big and 84% vs small. It's SB's ONLY overpair — uniquely valuable for protection. |
| "AA/KK should always bet big as 3-bettor" | Wrong on this board. AA bets 25% pot (43.6%) more than it bets big (27.8%). Not vulnerable to overcards. |
| "MDF says I should call here" | MDF is a GTO constraint, not a recommendation. Use pot odds and blocker analysis for river calling decisions. |
📊 PRACTICE THESE SPOTS
The best way to internalize these frequencies is deliberate practice. Postflop+ lets you train specific spots against a GTO bot and shows you where your strategy diverges from optimal. Solver+ gives you access to the precomputed solutions behind this analysis. And GTO Ranges+ helps you nail the preflop ranges that make everything downstream work.
Analysis based on GTO solver data for 100bb cash BvB 3-bet pots (flop 3♣5♦9♥). All frequencies are solver-derived. Run these spots yourself with Solver+.
Practice This Strategy in ThinkGTO
Apply what you've learned with ThinkGTO's GTO trainers and solver tools. Study real scenarios, drill against GTO bots, and build winning habits.
Try ThinkGTO FreeLevel Up Your Poker Strategy
Join thousands of players getting weekly GTO insights, strategy breakdowns, and training tips straight to their inbox. Free forever.
No spam, ever. Unsubscribe anytime.
You're in!